> For clean Markdown of any page, append `.md` to the page URL.
> For a complete documentation index, see https://docs.sarvam.ai/llms.txt.
> For full documentation content in one file, see https://docs.sarvam.ai/llms-full.txt.
> For AI client integration (Claude Code, Cursor, etc.), connect to the MCP server at https://docs.sarvam.ai/_mcp/server.
# Extract structured fields
> End-to-end dashboard walkthrough for pulling structured fields from documents as JSON, CSV, or Excel using Extract and Sarvam Vision.
**Extract** pulls specific fields out of a document (invoice numbers, dates, amounts, PAN, GST IDs, rider names, addresses) and returns them as structured data ready to download as JSON, CSV, or Excel.
This guide walks through the full Extract flow: open the Extract page, upload a document, describe what to extract, review the auto-drafted schema, and download the results.
## How it works
Every Extract project follows the same three-step flow.
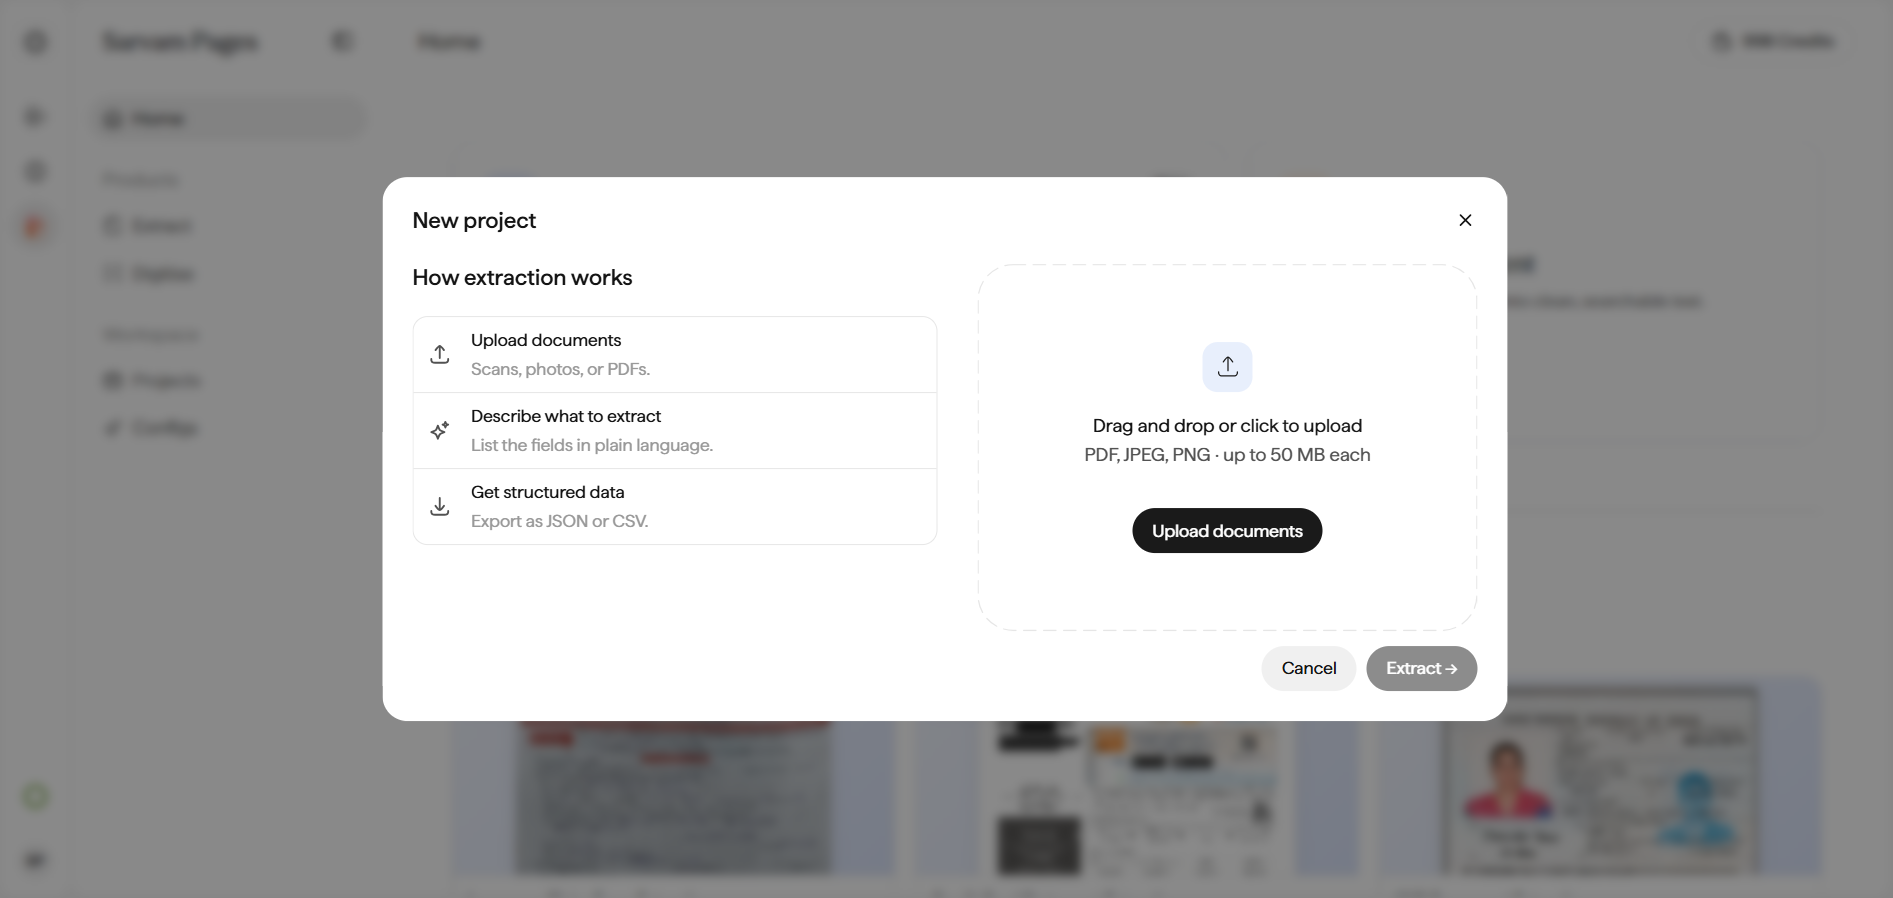 Drag and drop **PDF, JPEG, or PNG** files, up to **50 MB per file** and **10 pages per project**.
Write a plain-English prompt for the fields you want. Sarvam auto-drafts a schema from it.
Review the results with per-field confidence, then download as JSON, CSV, or Excel.
## Step 1: Open Extract and upload your document
Click **Extract** under **Products** in the sidebar. The **Extract from Documents** page shows an upload area and a shelf of Extract templates you can start from. Click **Upload files** (or click a template to prefill its settings) and drop in your file.
Drag and drop **PDF, JPEG, or PNG** files, up to **50 MB per file** and **10 pages per project**.
Write a plain-English prompt for the fields you want. Sarvam auto-drafts a schema from it.
Review the results with per-field confidence, then download as JSON, CSV, or Excel.
## Step 1: Open Extract and upload your document
Click **Extract** under **Products** in the sidebar. The **Extract from Documents** page shows an upload area and a shelf of Extract templates you can start from. Click **Upload files** (or click a template to prefill its settings) and drop in your file.
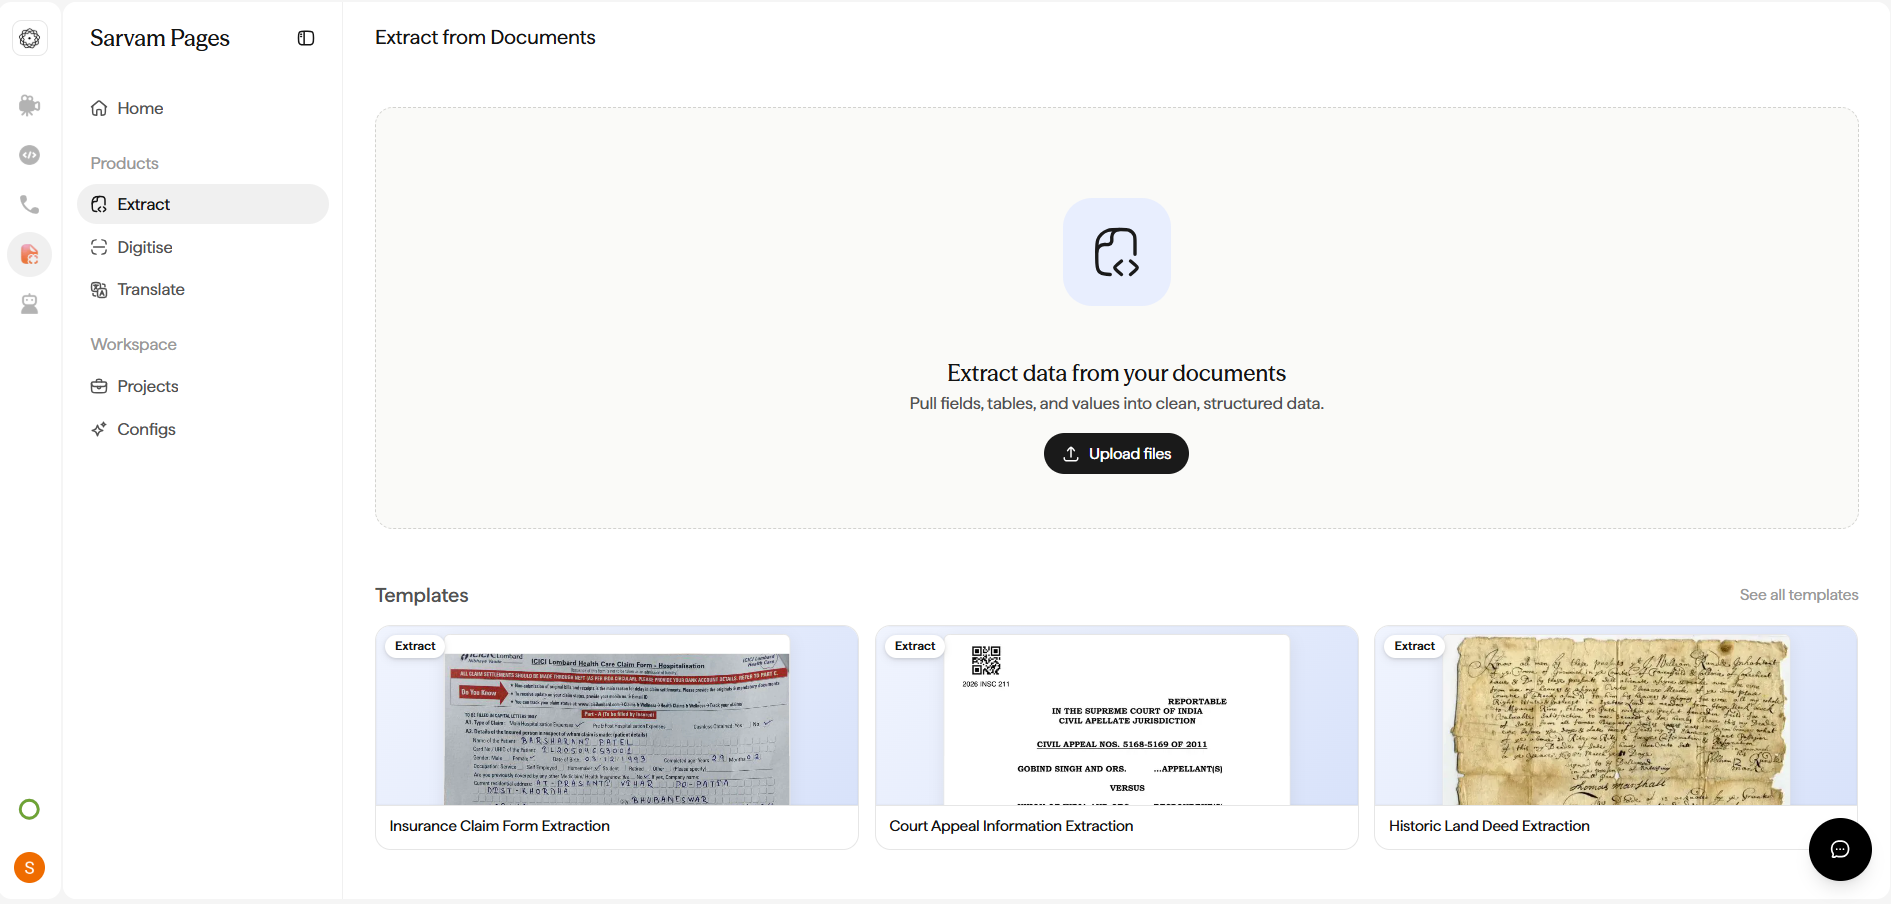 Supported formats: **PDF, JPEG, PNG**. Limits: **50 MB per file**, **10 pages per project**.
## Step 2: Configure the project
Once the file uploads, the dialog shows a preview of your document on the left and three fields on the right.
Supported formats: **PDF, JPEG, PNG**. Limits: **50 MB per file**, **10 pages per project**.
## Step 2: Configure the project
Once the file uploads, the dialog shows a preview of your document on the left and three fields on the right.
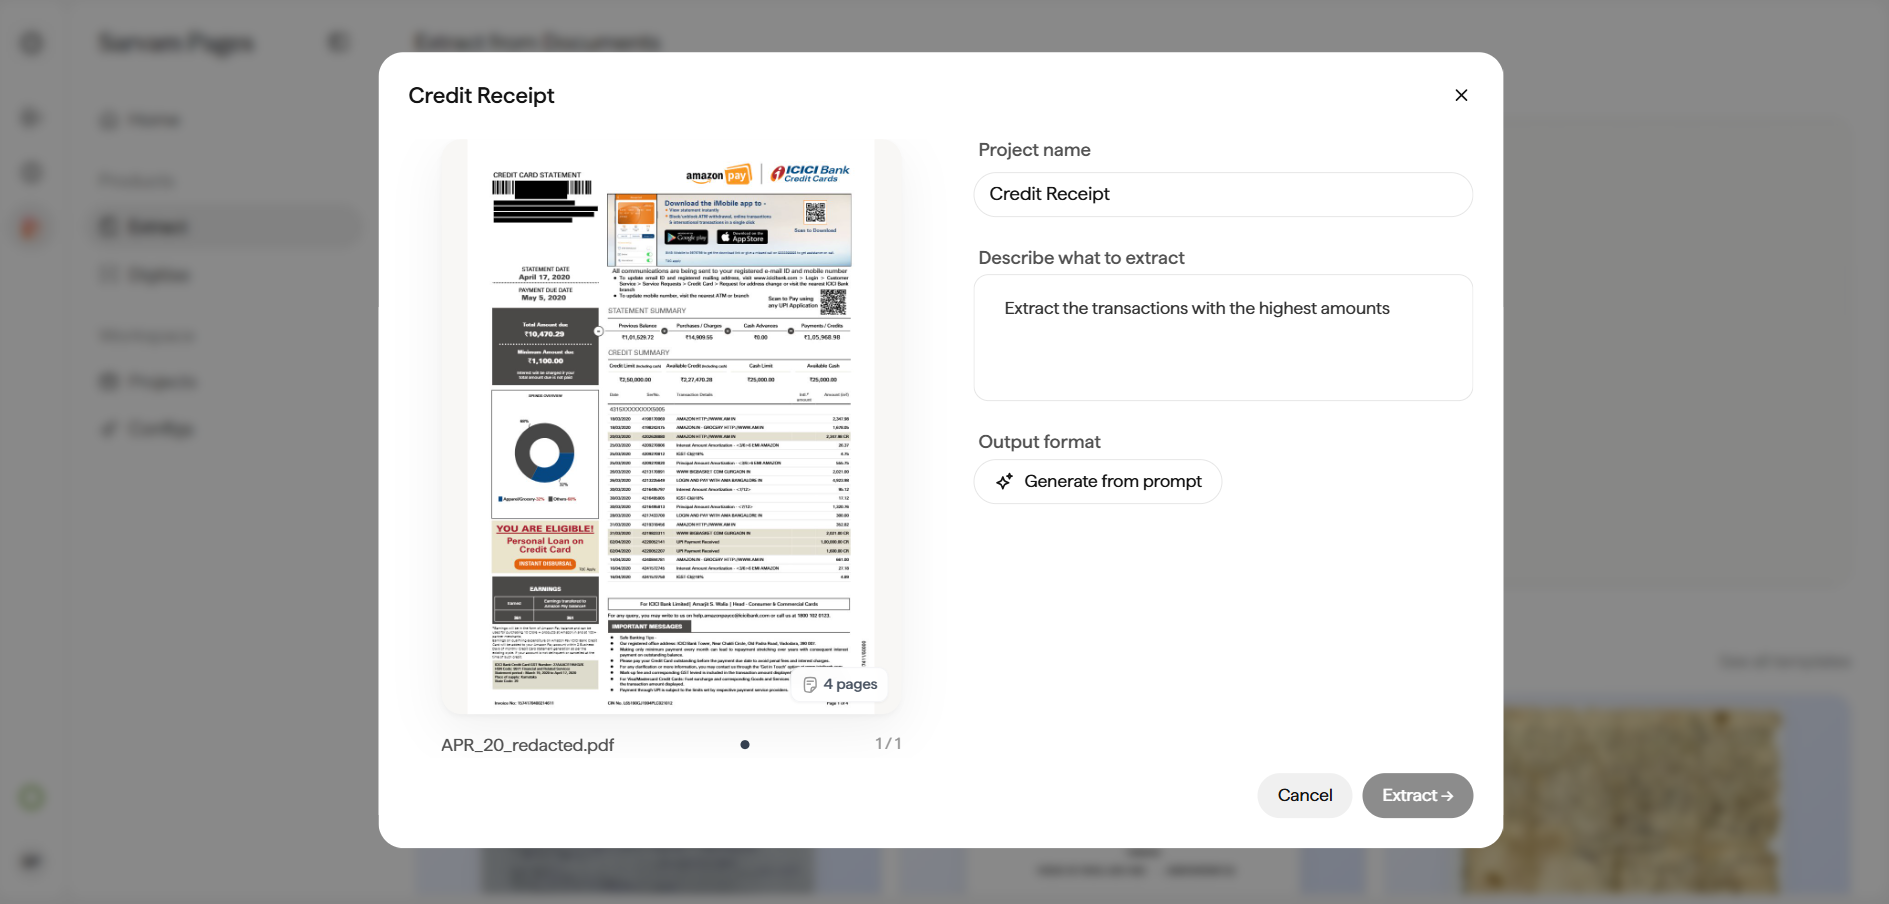 **Project name.** A short identifier like *Credit Receipt* or *Invoice batch May-Q2*. Shows up in the Projects list.
**Describe what to extract.** A plain-English prompt describing the fields you want. Copy and paste one of these into **Describe what to extract**, then edit for your document:
```text
Extract the transactions with the highest amounts.
```
**Output format.** Leave on **Generate from prompt** to let Sarvam auto-draft the schema, or pick a specific format.
Click **Extract →** to move on to the schema.
The extraction prompt is exactly that: a prompt. The more specific it is, the better the result. Copy one of these into **Describe what to extract** and adjust for your document:
```text
Weak: Get the fields.
Better: Extract rider name, trip date, trip time, total amount, and currency from the Uber receipt.
Best: Extract rider name, trip date (Jun 4, 2026 format), trip time (24-hour), total amount as a number, and the currency symbol. Also include the fare breakdown and payment details if visible.
```
## Step 3: Review the auto-drafted schema
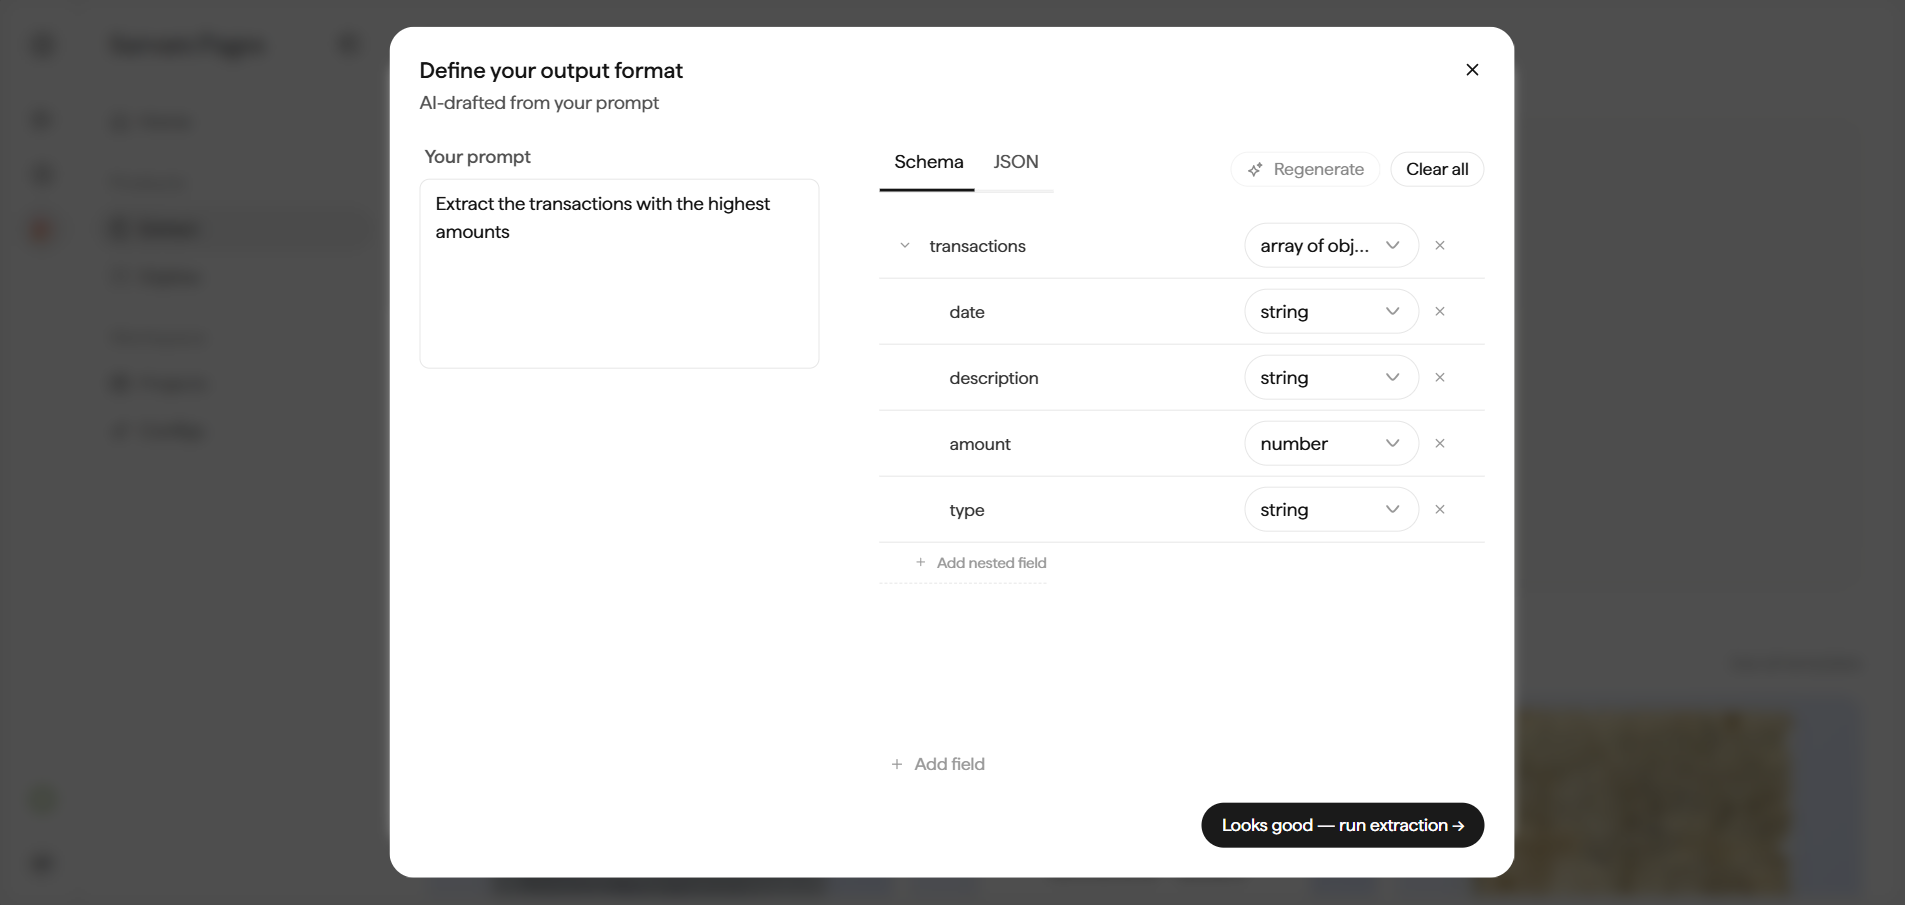
If **Output format = Generate from prompt**, Sarvam opens a **Define your output format** dialog before running the extraction. It contains an AI-drafted schema you can inspect and edit. The dialog has two tabs.
A visual, expandable view of every field the AI proposes. Each field has a **type** dropdown (`string`, `number`, `object`, `array of objects`, `date`, and more). Objects and arrays reveal nested fields underneath. Add fields with **+ Add field** or **+ Add nested field**; delete with the `×`.
**Project name.** A short identifier like *Credit Receipt* or *Invoice batch May-Q2*. Shows up in the Projects list.
**Describe what to extract.** A plain-English prompt describing the fields you want. Copy and paste one of these into **Describe what to extract**, then edit for your document:
```text
Extract the transactions with the highest amounts.
```
**Output format.** Leave on **Generate from prompt** to let Sarvam auto-draft the schema, or pick a specific format.
Click **Extract →** to move on to the schema.
The extraction prompt is exactly that: a prompt. The more specific it is, the better the result. Copy one of these into **Describe what to extract** and adjust for your document:
```text
Weak: Get the fields.
Better: Extract rider name, trip date, trip time, total amount, and currency from the Uber receipt.
Best: Extract rider name, trip date (Jun 4, 2026 format), trip time (24-hour), total amount as a number, and the currency symbol. Also include the fare breakdown and payment details if visible.
```
## Step 3: Review the auto-drafted schema
If **Output format = Generate from prompt**, Sarvam opens a **Define your output format** dialog before running the extraction. It contains an AI-drafted schema you can inspect and edit. The dialog has two tabs.
A visual, expandable view of every field the AI proposes. Each field has a **type** dropdown (`string`, `number`, `object`, `array of objects`, `date`, and more). Objects and arrays reveal nested fields underneath. Add fields with **+ Add field** or **+ Add nested field**; delete with the `×`.
 The same schema rendered as raw JSON: properties, types, and per-field descriptions. Useful if you want to paste the schema into a spec, share it with a teammate, or verify the structure programmatically.
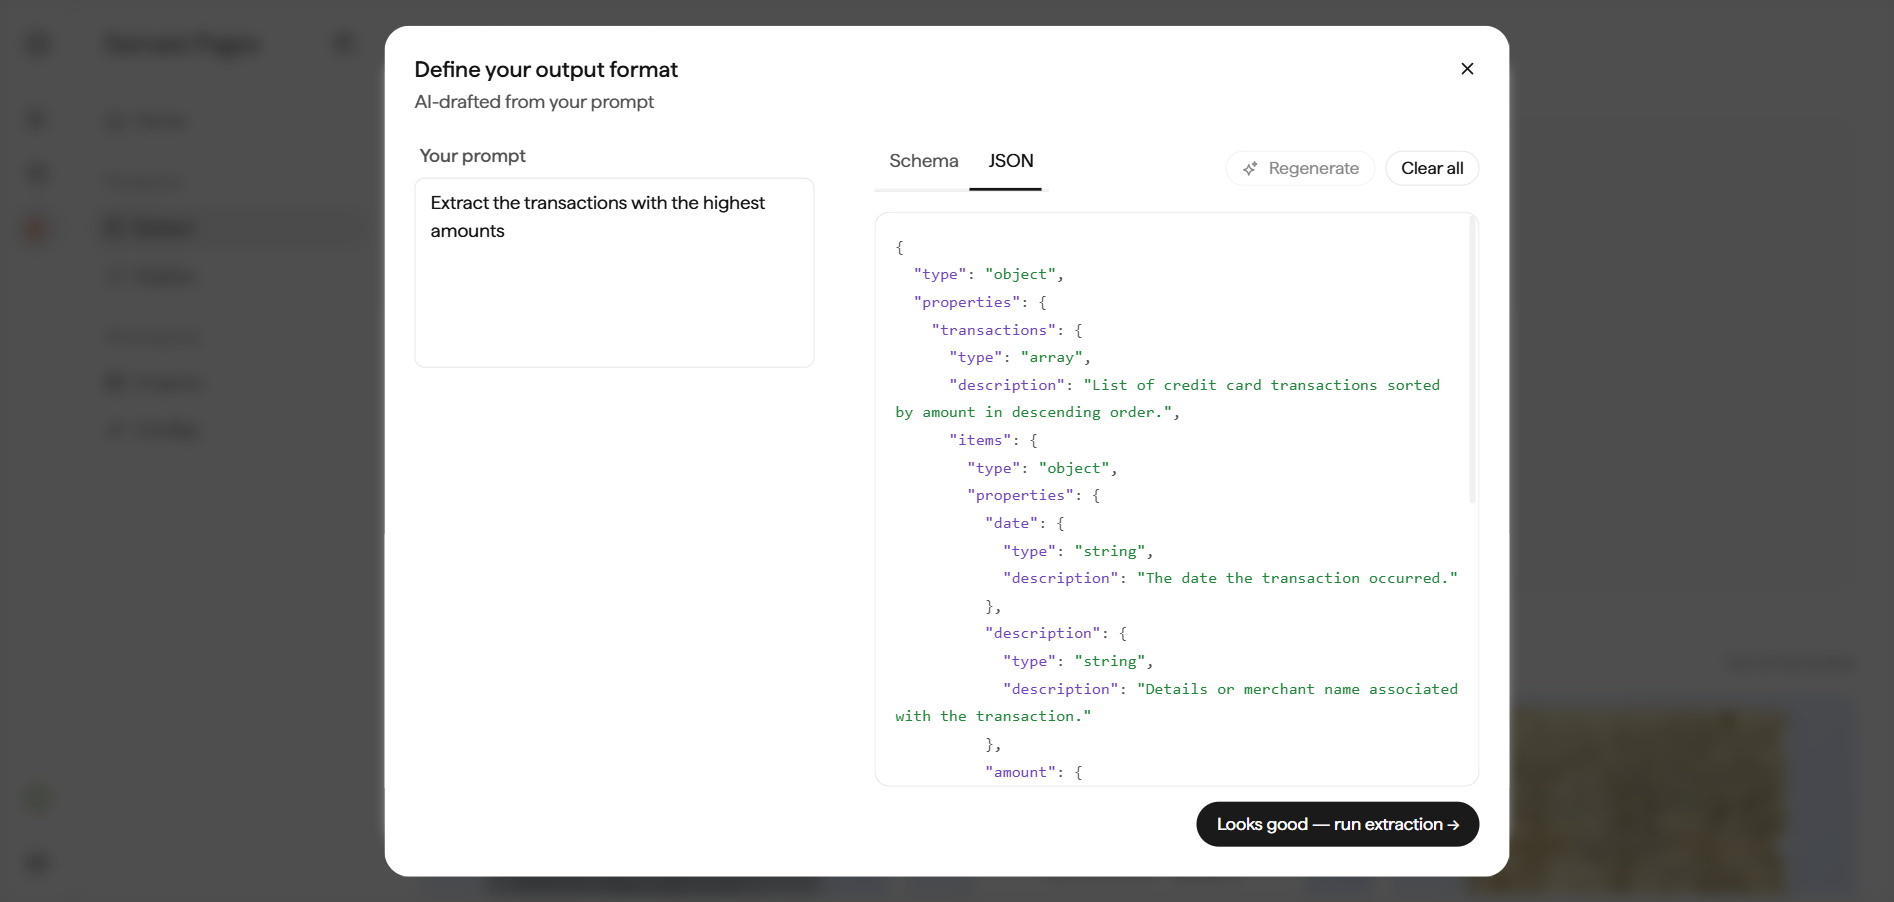 Edit the prompt on the left, click **Regenerate** to have Sarvam re-draft. Or **Clear all** to wipe the schema and start from an empty structure.
On the Schema tab, change field types (`string` to `date` or `number`), add or remove fields, and nest objects and arrays as your downstream system expects.
Once the schema looks right, click **Looks good, run extraction →**. The project starts running.
The auto-drafted schema is a starting point, not a lock-in. A Config saved with a good schema is worth building once and reusing everywhere.
## Step 4: Track processing
Your project appears in the list with a status that flows through:
* **Draft.** Project created but not yet submitted, for example if you closed the Extract dialog without confirming the schema.
* **Processing.** The Vision model is reading the pages and locating your fields.
* **Completed.** Ready to review. A notification also appears on the Home dashboard.
* **Failed.** Something went wrong. Open the project's `⋯` menu to retry or delete.
Most single-page receipts and invoices finish in a few seconds. Multi-page PDFs take proportionally longer.
## Step 5: Review the results
Click the project to open the results view. The source document sits on the left, and a hierarchical **Output** panel sits on the right. For documents like bank statements, the Output panel expands to show every transaction row with its own set of fields (date, description, amount, type), each carrying its own confidence score and source-page reference.
Edit the prompt on the left, click **Regenerate** to have Sarvam re-draft. Or **Clear all** to wipe the schema and start from an empty structure.
On the Schema tab, change field types (`string` to `date` or `number`), add or remove fields, and nest objects and arrays as your downstream system expects.
Once the schema looks right, click **Looks good, run extraction →**. The project starts running.
The auto-drafted schema is a starting point, not a lock-in. A Config saved with a good schema is worth building once and reusing everywhere.
## Step 4: Track processing
Your project appears in the list with a status that flows through:
* **Draft.** Project created but not yet submitted, for example if you closed the Extract dialog without confirming the schema.
* **Processing.** The Vision model is reading the pages and locating your fields.
* **Completed.** Ready to review. A notification also appears on the Home dashboard.
* **Failed.** Something went wrong. Open the project's `⋯` menu to retry or delete.
Most single-page receipts and invoices finish in a few seconds. Multi-page PDFs take proportionally longer.
## Step 5: Review the results
Click the project to open the results view. The source document sits on the left, and a hierarchical **Output** panel sits on the right. For documents like bank statements, the Output panel expands to show every transaction row with its own set of fields (date, description, amount, type), each carrying its own confidence score and source-page reference.
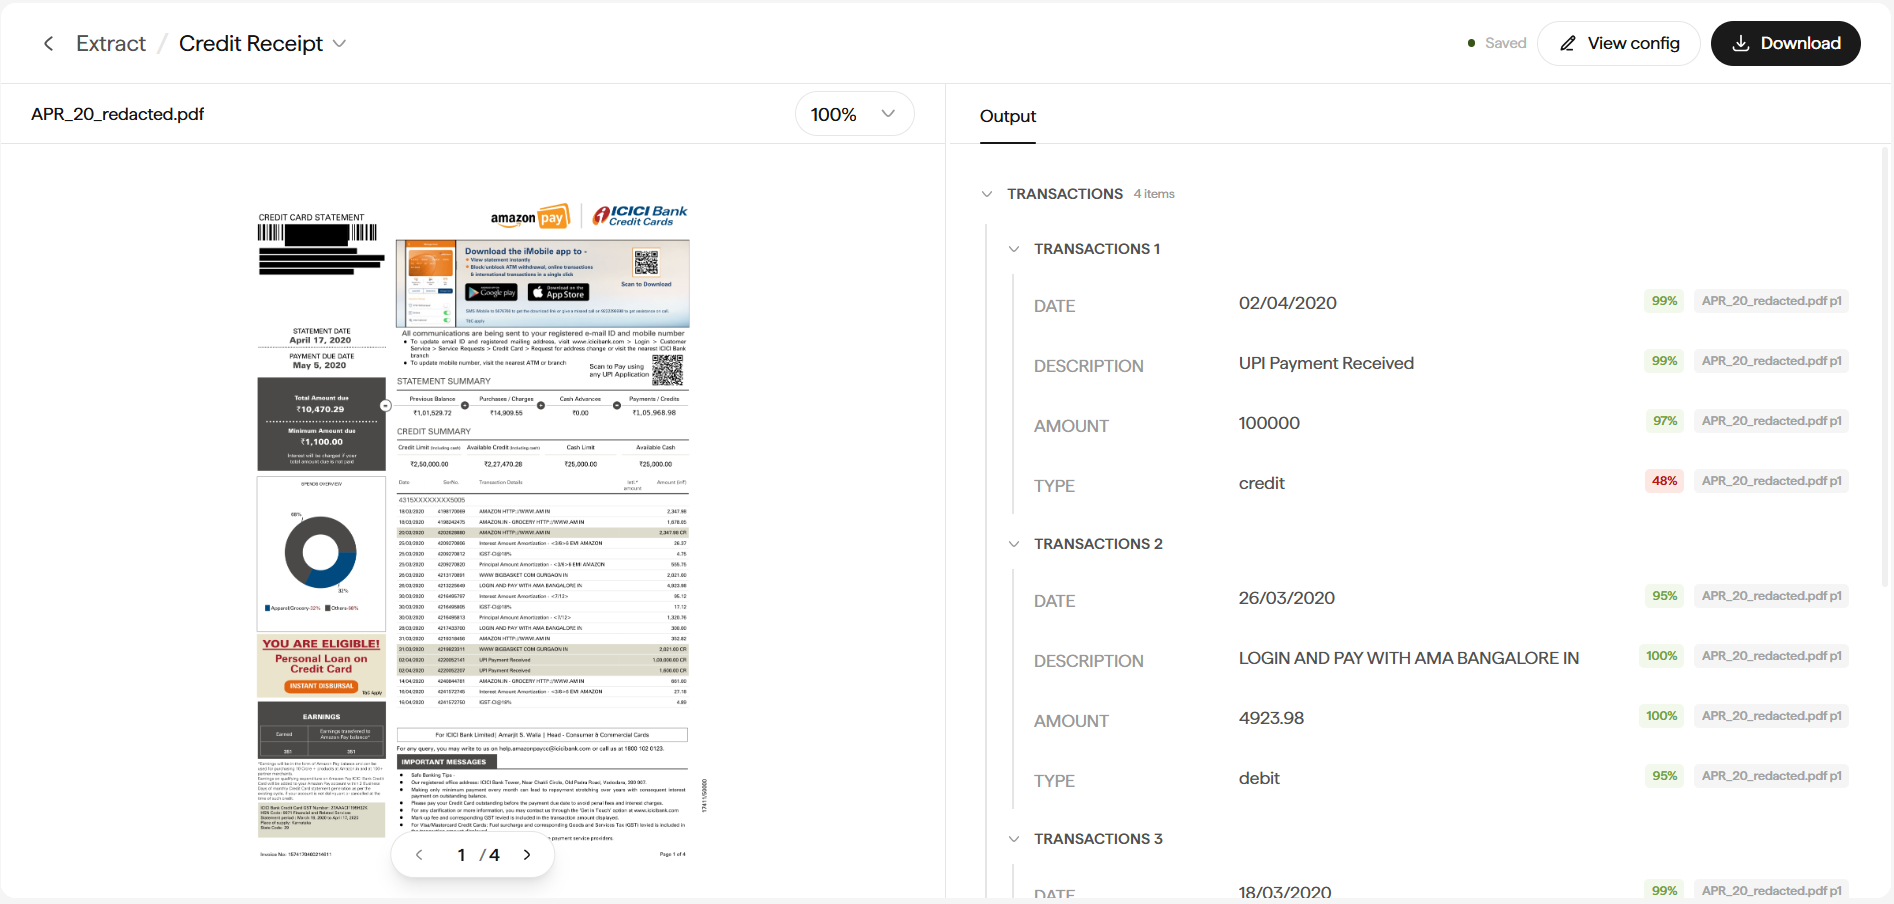 The **Output** panel groups extracted values by the top-level objects in your schema (e.g. **Statement Summary**, **Credit Summary**, **Transactions**). For every field you get:
The extracted string, number, date, list, or nested object. Fields that weren't found in the document appear as a dash.
A per-field score (e.g. `97%`) showing how sure Sarvam is about the value.
Object groups collapse and expand. Arrays show an item count (e.g. *Transactions, 1 item*) and expand to individual entries.
Click any value to correct it inline before downloading. Corrections apply to the exported file; the source document stays untouched.
## Step 6: Download
Click **Download** to open the export dialog. Choose your format:
Structured output keyed by your schema. Preserves nested objects and arrays exactly. Best for feeding into another system.
Flattened one-row-per-project layout. Great for consolidating many extractions into a single spreadsheet.
Native Excel workbook with formatting preserved.
Confirm to save the file to your computer.
## Handling multi-page documents
Multi-page PDFs are processed page-by-page and fields are consolidated into one Output panel. A page selector on the source pane (`< 1/N >`) lets you spot-check individual pages against the extracted values. Larger documents take longer to process but the flow is identical.
Each upload is capped at **50 MB per file** and **10 pages per project**. For longer PDFs, split into 10-page batches on your computer before uploading, then consolidate the results after export.
## Improving accuracy
*"Total amount"* is vague. *"Numeric total at the bottom of the invoice, after taxes, in INR"* is not. The prompt drives both the auto-drafted schema and the extraction. Treat it like a prompt to the model, because it is.
The auto-drafted schema often over- or under-specifies. Add missing fields, remove ones you don't need, tighten types (change `string` to `date` or `number` where appropriate). Better schema in equals better output out.
Once you've dialed in a great prompt and schema, save it as a Config. Everyone in the workspace picks up the same wording, so accuracy stays consistent across teammates.
Blurry or skewed scans hurt accuracy more than any prompt change. Re-scan at 300 DPI and straighten before uploading if you can.
For low-quality or handwritten documents, run a [Digitise Config](/pages/how-to/digitise-a-document) first to get clean structured text, then run your Extract Config over the digitised output. See [Chain Digitise and Extract](/pages/how-to/chain-digitise-and-extract).
Next: [Extract as CSV/Excel](/pages/how-to/extract-as-csv-excel).
The **Output** panel groups extracted values by the top-level objects in your schema (e.g. **Statement Summary**, **Credit Summary**, **Transactions**). For every field you get:
The extracted string, number, date, list, or nested object. Fields that weren't found in the document appear as a dash.
A per-field score (e.g. `97%`) showing how sure Sarvam is about the value.
Object groups collapse and expand. Arrays show an item count (e.g. *Transactions, 1 item*) and expand to individual entries.
Click any value to correct it inline before downloading. Corrections apply to the exported file; the source document stays untouched.
## Step 6: Download
Click **Download** to open the export dialog. Choose your format:
Structured output keyed by your schema. Preserves nested objects and arrays exactly. Best for feeding into another system.
Flattened one-row-per-project layout. Great for consolidating many extractions into a single spreadsheet.
Native Excel workbook with formatting preserved.
Confirm to save the file to your computer.
## Handling multi-page documents
Multi-page PDFs are processed page-by-page and fields are consolidated into one Output panel. A page selector on the source pane (`< 1/N >`) lets you spot-check individual pages against the extracted values. Larger documents take longer to process but the flow is identical.
Each upload is capped at **50 MB per file** and **10 pages per project**. For longer PDFs, split into 10-page batches on your computer before uploading, then consolidate the results after export.
## Improving accuracy
*"Total amount"* is vague. *"Numeric total at the bottom of the invoice, after taxes, in INR"* is not. The prompt drives both the auto-drafted schema and the extraction. Treat it like a prompt to the model, because it is.
The auto-drafted schema often over- or under-specifies. Add missing fields, remove ones you don't need, tighten types (change `string` to `date` or `number` where appropriate). Better schema in equals better output out.
Once you've dialed in a great prompt and schema, save it as a Config. Everyone in the workspace picks up the same wording, so accuracy stays consistent across teammates.
Blurry or skewed scans hurt accuracy more than any prompt change. Re-scan at 300 DPI and straighten before uploading if you can.
For low-quality or handwritten documents, run a [Digitise Config](/pages/how-to/digitise-a-document) first to get clean structured text, then run your Extract Config over the digitised output. See [Chain Digitise and Extract](/pages/how-to/chain-digitise-and-extract).
Next: [Extract as CSV/Excel](/pages/how-to/extract-as-csv-excel).