> For clean Markdown of any page, append `.md` to the page URL.
> For a complete documentation index, see https://docs.sarvam.ai/llms.txt.
> For full documentation content in one file, see https://docs.sarvam.ai/llms-full.txt.
> For AI client integration (Claude Code, Cursor, etc.), connect to the MCP server at https://docs.sarvam.ai/_mcp/server.
# Digitise a document
> Convert scans and handwritten documents into structured text with bounding boxes, section editing, and HTML, Markdown, or DOCX export.
**Digitise** converts a whole document (a printed page, a handwritten form, a scanned book, a historic manuscript) into clean, structured text. Headlines, section titles, paragraphs, tables, and images are all identified and preserved, so the output is ready for LLMs, RAG pipelines, publishing, or archives.
Digitise is not only for scans. Its typical use cases include:
Reports, product briefs, statements, and multi-page PDFs.
Patient notes, insurance forms, application submissions, personal letters.
Property titles, government registration papers, and legal filings, often in regional scripts.
19th-century manuscripts, Gujarati / Bengali / Tamil colonial-era records, court files, and out-of-print books.
## How it works
Every Digitise project follows the same three-step flow.
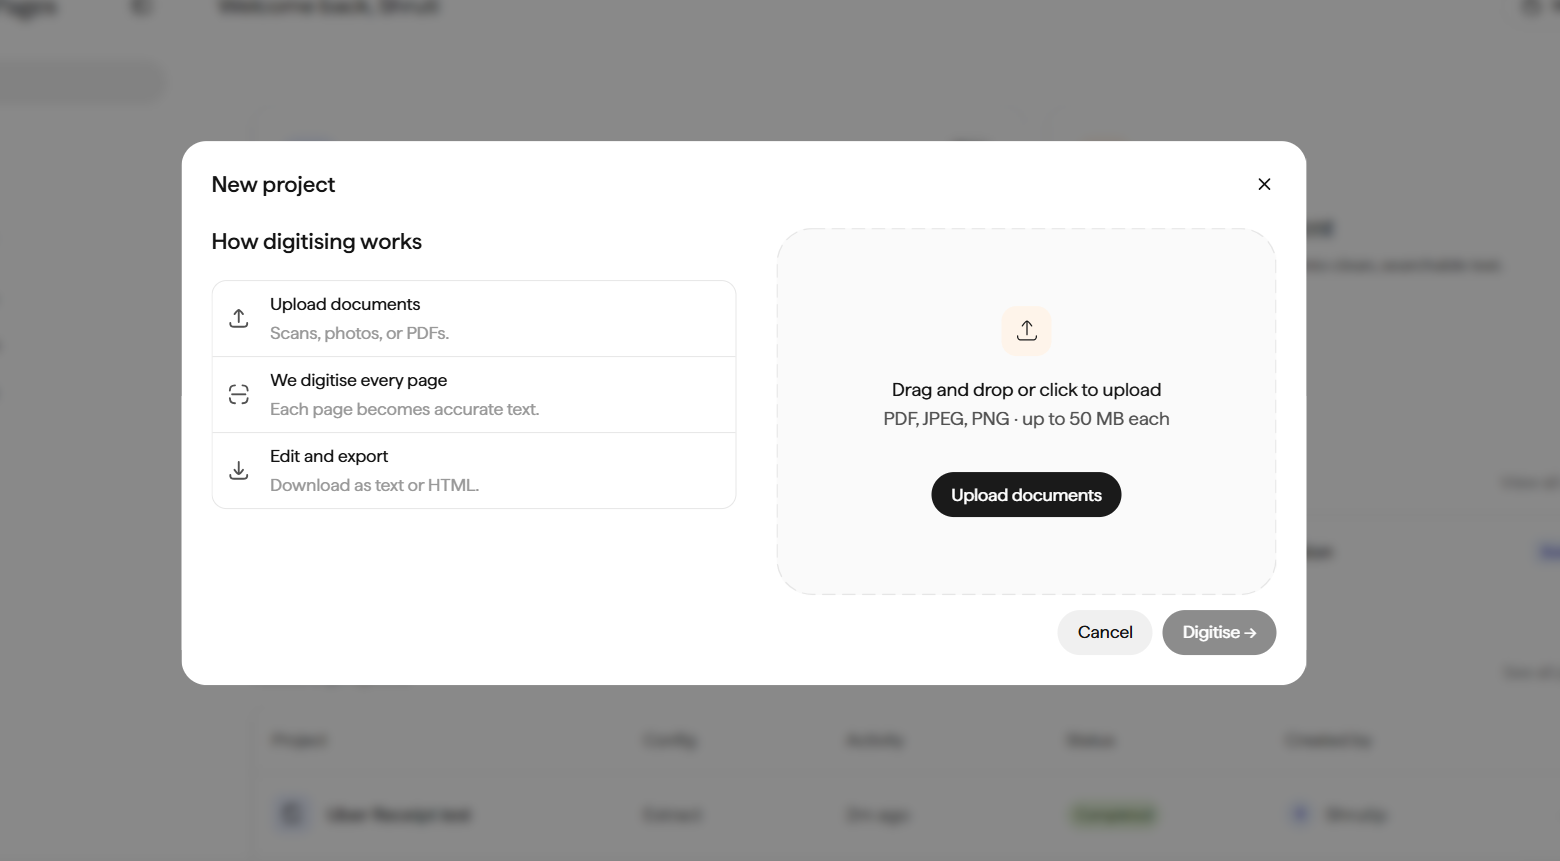 Drag and drop or click to upload **PDF, JPEG, or PNG** files, up to **50 MB per file** and **10 pages per project**.
Each page becomes accurate structured text with headings, section titles, paragraphs, tables, and reading order preserved.
Review side-by-side with the source, tweak anything by hand, and download as HTML, Markdown, DOCX, or Plain Text.
## Step 1: Open Digitise and upload your document
Click **Digitise** under **Products** in the sidebar. The Digitise page shows your Digitise configs and recent Digitise projects. Click **Upload files**, select your document in the file picker, and click **Open**.
Supported formats: **PDF, JPEG, PNG**. Limits: **50 MB per file**, **10 pages per project**. For longer documents, split into 10-page batches before uploading.
Three ready-made Digitise templates ship out of the box under **Workspace → Configs → Templates → Digitise**:
* **Land Deeds Digitisation** for property registration papers and legal records.
* **Digitise Handwritten Document** for scanned handwritten forms, patient notes, and letters.
* **Digitise Historic Gujarati Document** for regional-language historic manuscripts.
Duplicate any template into your own Config and tweak language or document format as needed.
## Step 2: Configure the project
Once the file uploads, the New Project dialog shows a preview of your document on the left and three fields on the right.
Drag and drop or click to upload **PDF, JPEG, or PNG** files, up to **50 MB per file** and **10 pages per project**.
Each page becomes accurate structured text with headings, section titles, paragraphs, tables, and reading order preserved.
Review side-by-side with the source, tweak anything by hand, and download as HTML, Markdown, DOCX, or Plain Text.
## Step 1: Open Digitise and upload your document
Click **Digitise** under **Products** in the sidebar. The Digitise page shows your Digitise configs and recent Digitise projects. Click **Upload files**, select your document in the file picker, and click **Open**.
Supported formats: **PDF, JPEG, PNG**. Limits: **50 MB per file**, **10 pages per project**. For longer documents, split into 10-page batches before uploading.
Three ready-made Digitise templates ship out of the box under **Workspace → Configs → Templates → Digitise**:
* **Land Deeds Digitisation** for property registration papers and legal records.
* **Digitise Handwritten Document** for scanned handwritten forms, patient notes, and letters.
* **Digitise Historic Gujarati Document** for regional-language historic manuscripts.
Duplicate any template into your own Config and tweak language or document format as needed.
## Step 2: Configure the project
Once the file uploads, the New Project dialog shows a preview of your document on the left and three fields on the right.
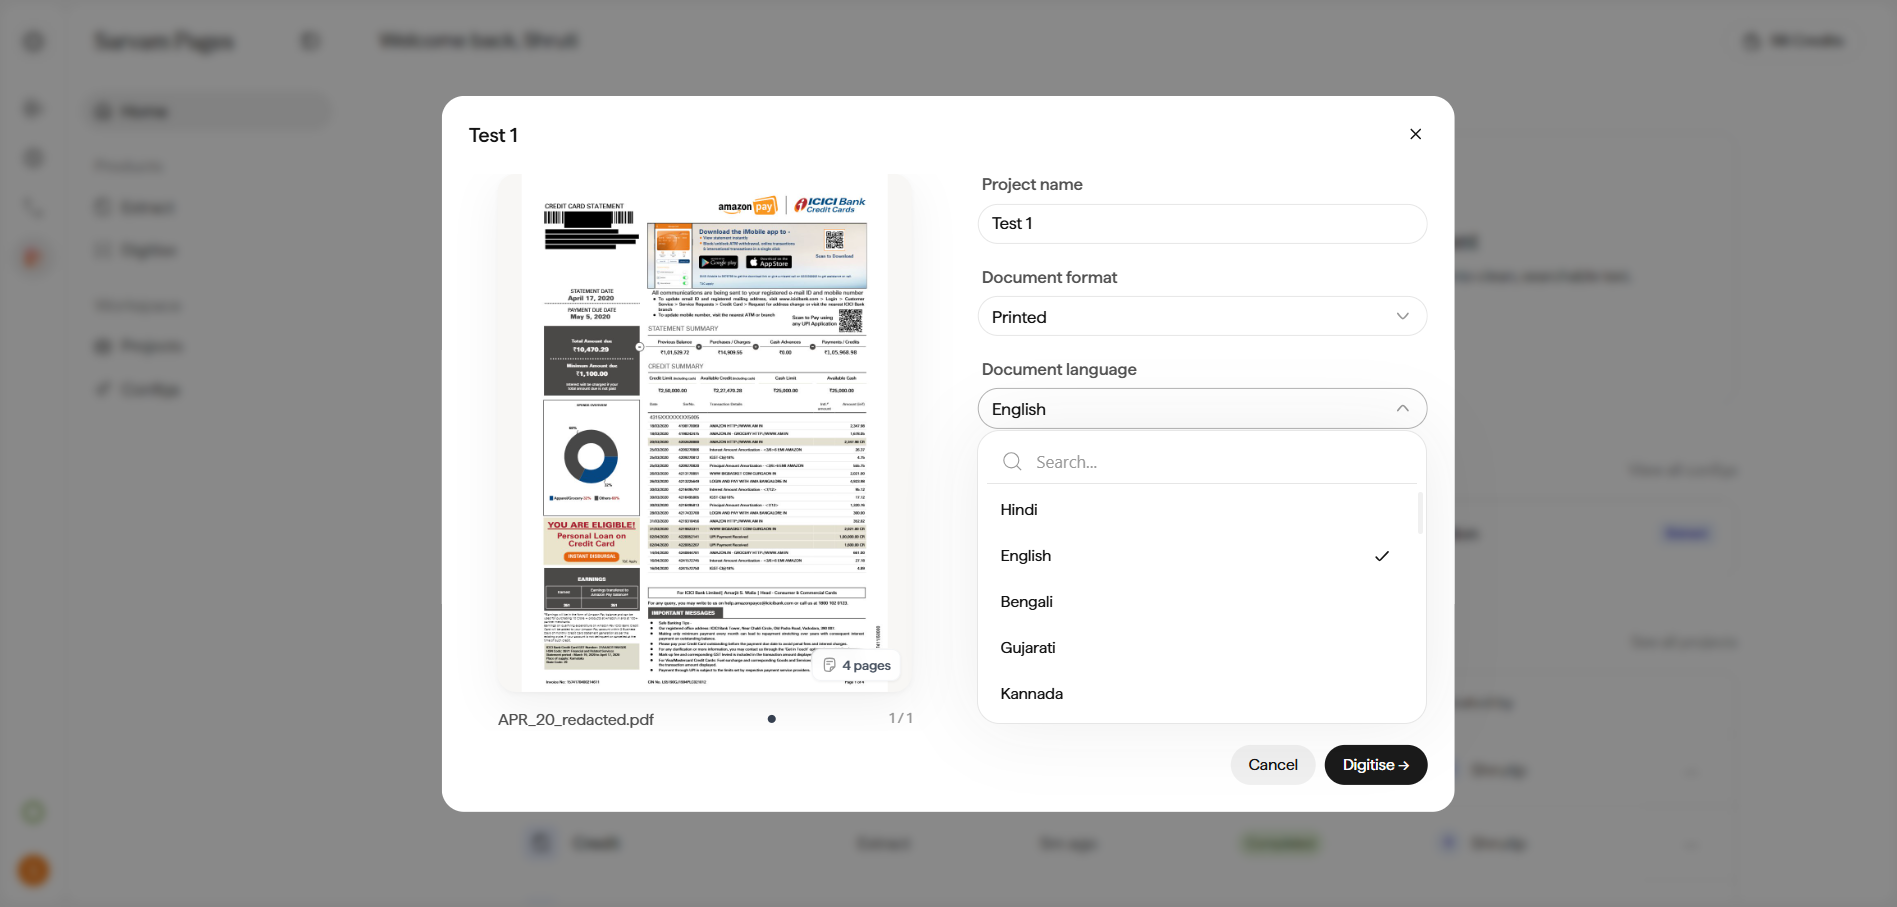 **Project name.** A short identifier like *Test 1*, *Court ruling 1987*, or *Gujarati Land Deed 22-A*. Shows up in the Projects list.
**Document format.** Choose the option that matches the source: **Printed** for typeset books, statements, and product reports; **Handwritten** for handwritten forms, manuscripts, and personal notes; or **Mixed (handwritten & printed)** for forms with typed labels and handwritten answers.
**Document language.** Pick the primary language from the searchable dropdown: **English, Hindi, Bengali, Gujarati, Kannada**, and other supported languages. Sarvam Vision has SOTA accuracy on 22 Indian languages plus English.
Click **Digitise →** to run the project.
## Step 3: Track processing
The project appears in your list and progresses through **Draft → Processing → Completed** (or **Failed** if something went wrong). A *"Project submitted, we'll notify you when it's ready"* toast confirms the run. Single-page documents typically finish in seconds; long PDFs take proportionally longer.
## Step 4: Review and edit the output
Click the project to open the editor.
**Project name.** A short identifier like *Test 1*, *Court ruling 1987*, or *Gujarati Land Deed 22-A*. Shows up in the Projects list.
**Document format.** Choose the option that matches the source: **Printed** for typeset books, statements, and product reports; **Handwritten** for handwritten forms, manuscripts, and personal notes; or **Mixed (handwritten & printed)** for forms with typed labels and handwritten answers.
**Document language.** Pick the primary language from the searchable dropdown: **English, Hindi, Bengali, Gujarati, Kannada**, and other supported languages. Sarvam Vision has SOTA accuracy on 22 Indian languages plus English.
Click **Digitise →** to run the project.
## Step 3: Track processing
The project appears in your list and progresses through **Draft → Processing → Completed** (or **Failed** if something went wrong). A *"Project submitted, we'll notify you when it's ready"* toast confirms the run. Single-page documents typically finish in seconds; long PDFs take proportionally longer.
## Step 4: Review and edit the output
Click the project to open the editor.
 ### Editor layout
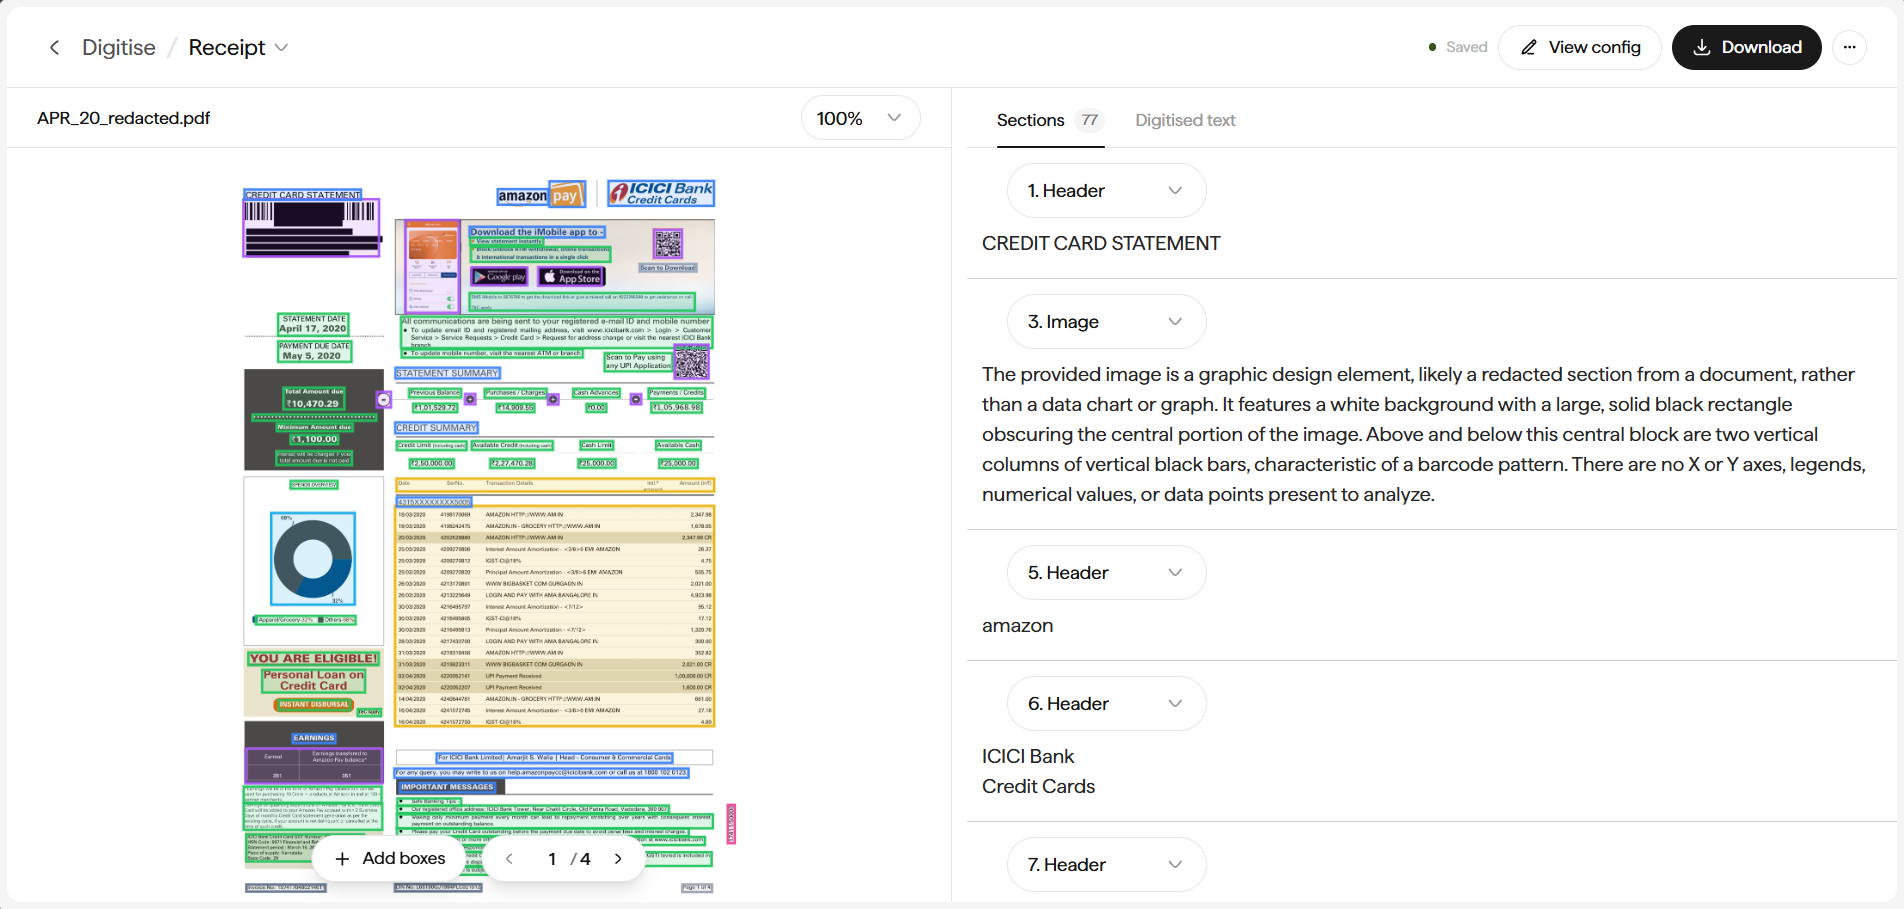
Your document rendered at full resolution with **color-coded bounding boxes** on every detected element (headers, paragraphs, images, tables, footnotes). Zoom is controlled from the pane's zoom dropdown (defaults to `100%`).
Every detected element as a numbered card, ordered top-to-bottom. Each card has a **type dropdown** and the extracted content underneath. Tables render inline with the data preserved.
### The Sections and Digitised text tabs
The right pane has two tabs:
Numbered, editable list of every element Sarvam detected. Each section has:
* A **type dropdown** to reclassify by picking from the list of section types (see below).
* The **content**. Click to edit inline. Text sections edit as plain text; **Table** sections render as a proper grid and are editable cell-by-cell.
A read-only preview of the final formatted output. How it will look in the exported file, with headings, paragraphs, and tables typeset properly.
Edits made in the **Sections** tab save to the download but won't update the preview here in real time.
### Section types
Sarvam classifies every detected region into one of the following types. Change the type on any section with the type dropdown, or use it when drawing a new box (see below).
| Type | Typical content |
| ------------------- | ------------------------------ |
| `headline` | Document title |
| `sub-headline` | Secondary title |
| `section-title` | Section heading |
| `header` | Page or column header |
| `paragraph` | Body text |
| `footer` | Page footer |
| `footnote` | Note referenced from body text |
| `page-number` | Folio / page number |
| `table` | Tabular data |
| `image` | Figure or graphic |
| `image-caption` | Caption under an image |
| `photograph` | Photographic content |
| `chart` / `diagram` | Charts and diagrams |
| `advertisement` | Ad blocks |
| `folio` | Book folio marker |
### Editing tables with the Table Editor
**Double-click any table on the right pane** (the rendered grid inside its Table section) to open the dedicated **Table Editor** modal. It's the fastest way to review and fix a tabular region without losing the surrounding page context.
### Editor layout
Your document rendered at full resolution with **color-coded bounding boxes** on every detected element (headers, paragraphs, images, tables, footnotes). Zoom is controlled from the pane's zoom dropdown (defaults to `100%`).
Every detected element as a numbered card, ordered top-to-bottom. Each card has a **type dropdown** and the extracted content underneath. Tables render inline with the data preserved.
### The Sections and Digitised text tabs
The right pane has two tabs:
Numbered, editable list of every element Sarvam detected. Each section has:
* A **type dropdown** to reclassify by picking from the list of section types (see below).
* The **content**. Click to edit inline. Text sections edit as plain text; **Table** sections render as a proper grid and are editable cell-by-cell.
A read-only preview of the final formatted output. How it will look in the exported file, with headings, paragraphs, and tables typeset properly.
Edits made in the **Sections** tab save to the download but won't update the preview here in real time.
### Section types
Sarvam classifies every detected region into one of the following types. Change the type on any section with the type dropdown, or use it when drawing a new box (see below).
| Type | Typical content |
| ------------------- | ------------------------------ |
| `headline` | Document title |
| `sub-headline` | Secondary title |
| `section-title` | Section heading |
| `header` | Page or column header |
| `paragraph` | Body text |
| `footer` | Page footer |
| `footnote` | Note referenced from body text |
| `page-number` | Folio / page number |
| `table` | Tabular data |
| `image` | Figure or graphic |
| `image-caption` | Caption under an image |
| `photograph` | Photographic content |
| `chart` / `diagram` | Charts and diagrams |
| `advertisement` | Ad blocks |
| `folio` | Book folio marker |
### Editing tables with the Table Editor
**Double-click any table on the right pane** (the rendered grid inside its Table section) to open the dedicated **Table Editor** modal. It's the fastest way to review and fix a tabular region without losing the surrounding page context.
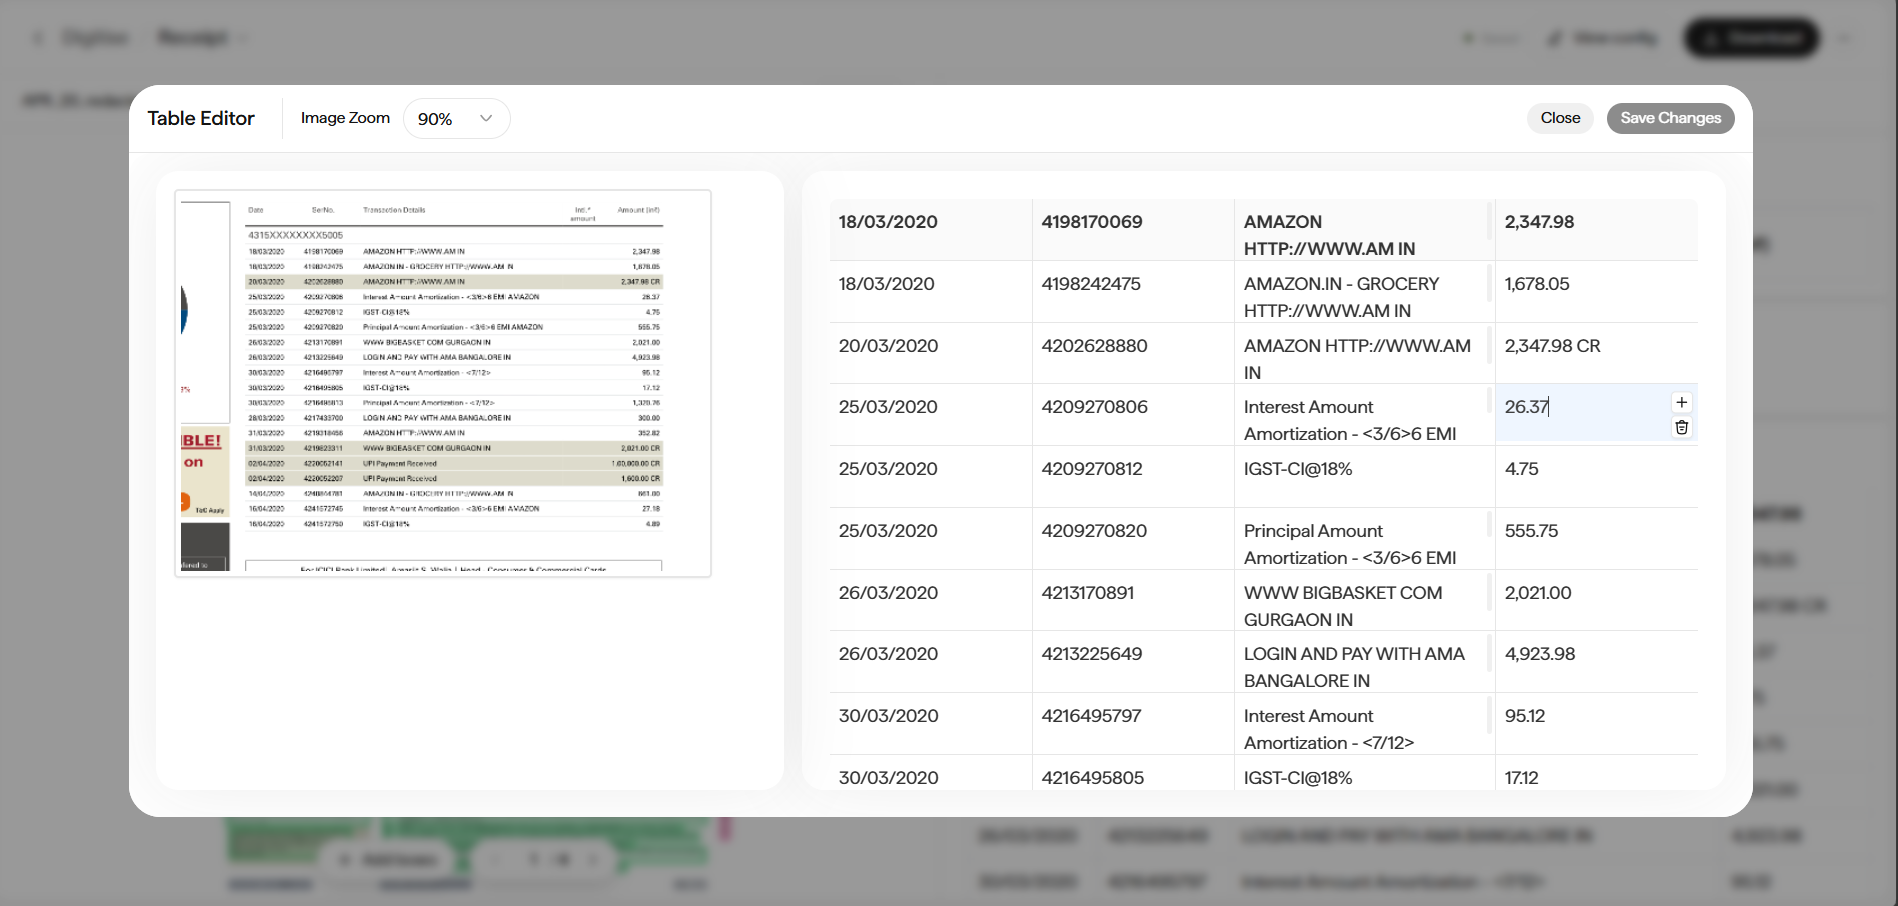 Use the **Image Zoom** dropdown (90%, 75%, and other steps) on the toolbar to verify values against dense statements.
Click any cell to edit its value directly. Number, date, and text cells all accept free-form input.
Hover any cell to reveal the `+` and trash icons for adding or removing rows.
**Save Changes** commits your edits back to the Sections list and the eventual download. **Close** discards them.
The Table Editor is especially useful for bank statements and invoices where a handful of cells (currency symbols, OCR-misread digits) benefit from a quick human touch-up before export.
### Add missing regions with Add boxes
If Sarvam missed a region (a caption, a footnote, an extra column), you can draw it in.
Use the **Image Zoom** dropdown (90%, 75%, and other steps) on the toolbar to verify values against dense statements.
Click any cell to edit its value directly. Number, date, and text cells all accept free-form input.
Hover any cell to reveal the `+` and trash icons for adding or removing rows.
**Save Changes** commits your edits back to the Sections list and the eventual download. **Close** discards them.
The Table Editor is especially useful for bank statements and invoices where a handful of cells (currency symbols, OCR-misread digits) benefit from a quick human touch-up before export.
### Add missing regions with Add boxes
If Sarvam missed a region (a caption, a footnote, an extra column), you can draw it in.
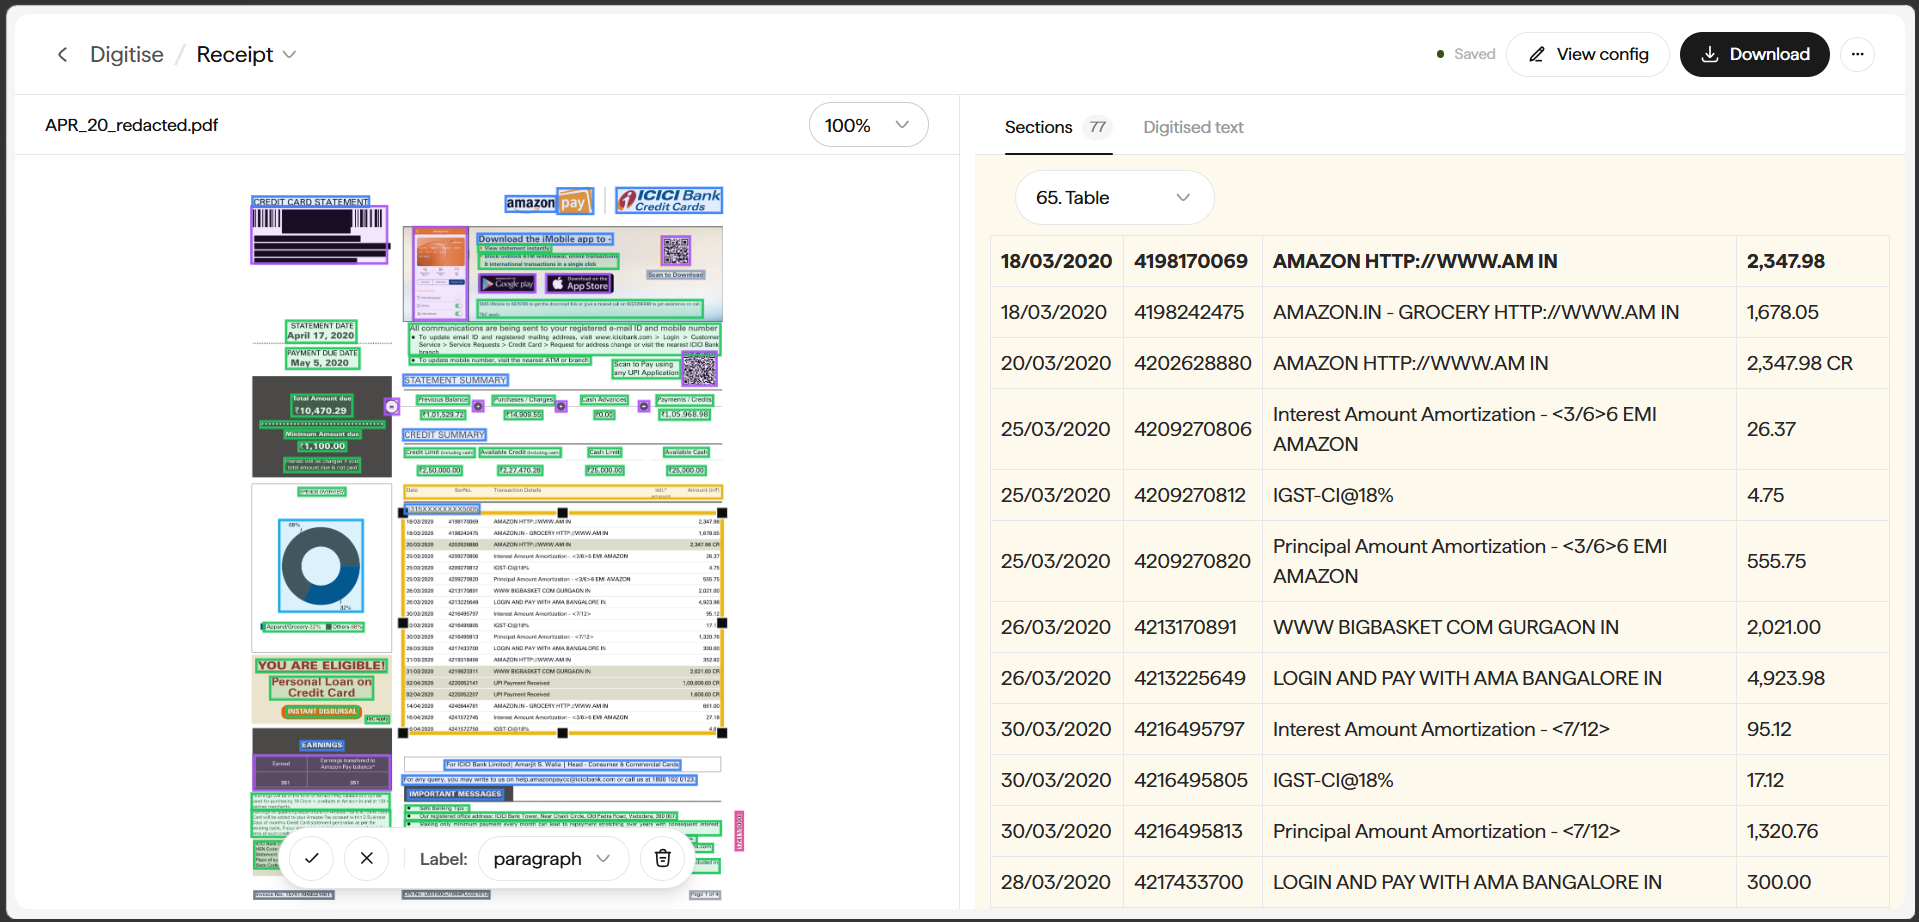 Click **+ Add boxes** on the source pane.
Click and drag on the source page to draw a box around the region you want to capture.
The bottom bar shows: `✓ × Label:[paragraph ▾] 🗑`. Open the **Label** dropdown to pick the section type. It's the same list Sarvam uses for auto-detected sections.
Click **✓** to add the box (it appears in the Sections list). Click **×** or the trash icon to discard.
Add boxes is available on Digitise projects only. Extract does not use bounding boxes.
### Navigate multi-page documents
For multi-page uploads, use the page selector on the source pane (`< 1/N >`). Each page's bounding boxes are shown when that page is active; the Sections pane scrolls to the sections belonging to the current page.
The Sections tab shows a running count in its label (e.g. `Sections 77`). That's the total across every page in the document.
### View the underlying Config
Click **View config** in the editor toolbar to see the Config that drove this project: its Document format, Document language, and any advanced settings. Handy when you're troubleshooting output that doesn't match expectations.
## Step 5: Download
When you're happy with the output, click **Download** in the editor toolbar. Choose your format from the dropdown:
Preserves rich layout (headings, images, tables, colored spans). Best for publishing to the web or feeding into any HTML-aware tool.
Clean, LLM-friendly text with heading levels and tables. Best for RAG pipelines, embedding, and archival.
Native Word format. Best when the downstream user will hand-edit the document further.
Flat text without formatting. Best for lightweight indexing and search.
## Feeding clean output into an LLM or RAG pipeline
Digitised structured text is a much better LLM input than raw OCR:
* **Headings become natural chunk boundaries.** Split on section titles for coherent chunks.
* **Tables stay parseable.** Sarvam preserves them as tables, not as jumbled words.
* **Reading order matches expectations.** No column-mixing on multi-column layouts.
If your RAG pipeline currently ingests raw OCR, swap in a Digitise Markdown export and re-measure retrieval quality. Most teams see immediate improvement.
Next: [Extract as CSV/Excel](/pages/how-to/extract-as-csv-excel).
Click **+ Add boxes** on the source pane.
Click and drag on the source page to draw a box around the region you want to capture.
The bottom bar shows: `✓ × Label:[paragraph ▾] 🗑`. Open the **Label** dropdown to pick the section type. It's the same list Sarvam uses for auto-detected sections.
Click **✓** to add the box (it appears in the Sections list). Click **×** or the trash icon to discard.
Add boxes is available on Digitise projects only. Extract does not use bounding boxes.
### Navigate multi-page documents
For multi-page uploads, use the page selector on the source pane (`< 1/N >`). Each page's bounding boxes are shown when that page is active; the Sections pane scrolls to the sections belonging to the current page.
The Sections tab shows a running count in its label (e.g. `Sections 77`). That's the total across every page in the document.
### View the underlying Config
Click **View config** in the editor toolbar to see the Config that drove this project: its Document format, Document language, and any advanced settings. Handy when you're troubleshooting output that doesn't match expectations.
## Step 5: Download
When you're happy with the output, click **Download** in the editor toolbar. Choose your format from the dropdown:
Preserves rich layout (headings, images, tables, colored spans). Best for publishing to the web or feeding into any HTML-aware tool.
Clean, LLM-friendly text with heading levels and tables. Best for RAG pipelines, embedding, and archival.
Native Word format. Best when the downstream user will hand-edit the document further.
Flat text without formatting. Best for lightweight indexing and search.
## Feeding clean output into an LLM or RAG pipeline
Digitised structured text is a much better LLM input than raw OCR:
* **Headings become natural chunk boundaries.** Split on section titles for coherent chunks.
* **Tables stay parseable.** Sarvam preserves them as tables, not as jumbled words.
* **Reading order matches expectations.** No column-mixing on multi-column layouts.
If your RAG pipeline currently ingests raw OCR, swap in a Digitise Markdown export and re-measure retrieval quality. Most teams see immediate improvement.
Next: [Extract as CSV/Excel](/pages/how-to/extract-as-csv-excel).